Simple way to Store and Preserve Fresh Curry Leaves

Fresh Curry Leaves Stored

Just the aroma of curry leaves incites hunger.

Curry leaves, known as karuveppilai in tamil, are one of the common seasoning ingredient that is added to almost every dish to enhance its taste and flavour.

They are not related to curry powder, which is actually a blend of spices.

However, rather than eating this humble leaf, most of us just throw it away. But have you ever wondered if you have to throw this leaf then why did our mothers use this leaf to every food preparation?

Because besides rending a distinct flavour to the various dishes they are added to, the rich, glossy green leaves come packed with a bevy of health benefits.

Right from helping your heart to function in a better way to enlivening your hair and skin with vitality, Curry leaves have just the health boost you need.

Simple way to Store and Preserve fresh Curry Leaves

  1. Wash the leaves in running water and let them drain in a colander for 30 mins.
  2. Take out the sprigs from the stem but don’t remove the leaves!
  3. Put them on a large kitchen towel and gently pat them dry.
  4. Take a clean dry glass jar and store the curry leaf stalks in it.
  5. Keep the lid closed and store in the fridge.

From curing diabetes to digestive disorders, Curry leaves do more than just seasoning your food.

Thanks to being :

  • a source of proteins, amino acids, antioxidants, alkaloids and anti–inflammatory benefits.
  • packed with fibre, calcium, phosphorous, iron, vitamins C, A, B and E.Â.

Health Benefits

  • Diabetes: eating 10 fresh fully grown curry leaves every morning for three consecutive months will help keep hereditary diabetes at bay. It also cures diabetes that’s caused due to obesity, as the leaves have weight-reducing properties.
  • Kidney Disorders: The root of the plant is used for medicinal purposes. The juice of these leaves can be consumed to relieve kidney pain.
  • Premature Greying: Moderate intake of curry leaves helps prevent premature greying of the hair. The leaves can also be applied on the scalp and hair in the form of a paste.
  • Strengthening hair roots: Dry curry leaf powder mixed in oil can be applied to your hair with a quick massage. Doing these on a regular basis can improve hair growth and cure hairfall as well.
  • Anti-bacterial properties: Curry leaves helps fight against skin infections.
  • Eye Disorders: Curry leaf is a good source of vitamin A and hence provides protection against developing cataract.Prevent early development of cataract by using the fresh juice from curry leaves as an eye drop.
  • Digestive Disorders: Treat morning sickness and nausea by consuming fresh juice of curry leaves with lime juice and sugar. They are also useful in treating diarrhea, , gastrointestinal problems dysentery and as indigestion, excessive acid secretion, peptic ulcers and piles.
  • Cholesterol balance: Curry leaves are also known to reduce bad LDL cholesterol level. They protect one from heart disease—increasing the “good” cholesterol (HDL).
  • Anaemia: They are a rich source of iron and folic acid (which helps the body absorb iron) and thus counter anaemia.
  • Liver Disorders: They are known to help protect the liver. Preventing it from damage, and stimulating it to work better.
  • They are also believed to have cancer fighting properties.

I have rarely come across an ingredient that seems so miraculous. Which could also be why that in the absence of tulasi (basil) leaves, curry leaves are in fact used in ritualistic worship.

You can find more informations here

Quantico’s Priyanka Chopra hair secret : the Coconut Oil

Beauty Priyanka chopra

Quantico’s Priyanka Chopra, stunning beauty queen and Bollywood star shares her inexpensive and healthy hair secret: the Coconut Oil. And it goes way back to childhood.

“In India, my mom and my grandmother used to put coconut oil on my hair and rub it into my head when I was younger. Coconut oil is amazing, Put it on and leave it in for two hours or overnight, but really massage it in, it’ll stimulate the roots to help the hair become stronger and longer.

Coconut oil head massages are like a tradition in the family, from a mother to a daughter in India,it brings them together and bonds them in a way…

Using coconut oil helps revive my hair from all of the styling it endures while working. My hair gets blown out everyday so a coconut oil massage is so good to help repair hair from the damage, which prevention recommends as an excellent deep conditioner, especially because it is able to penetrate the hair shaft effectively. I do it on nights when I’m at home and watching TV”

Quantico Priyanka Chopra hair secret

Coconut oil is outstanding when used for hair repair. Simply coat your hair, roots to ends, massage through your hair and leave it on for at least a few hours, preferably overnight. Then, wash your hair with your shampoo of choice.
It also helps to combat dry scalp without leaving an oil slick on your hair.

If you keep the oil on for many hours, your hair may be so soft that you will not even need conditioner after washing. Repeat once a week for soft, healthy and shiny hair or twice a week, if your hair is very damaged.
Say goodbye to a bathroom full of pricey beauty products… coconut oil seems to be the incredible natural answer for your hair.

Coconut oil

Among the oils that have been studied for their benefits on hair, coconut oil is the only one that is able to penetrate deep into the hair shaft due to its affinity for hair protein and its molecular structure.

For this reason, it is able to reduce protein loss and restore damaged hair, such as from heated styling tools, sun exposure and harsh hair dyes.

How to make Spinach Sambar

Spinach Sambar

Be it with idlis, dosas, vadais or rice, sambar is undoubtedly an indispensible part of South Indian cuisine.
Don’t wait for a wedding invitation to eat this sumptuous South Indian spinach sambar!

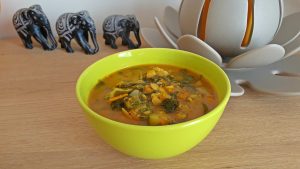
Easy & Quick Sambar Recipe, How to make Spinach Sambar.

Ingredients for Spinach Sambar

  • Tuvar dal/pigeon pea lentils – 50g  pressure cooked until the dal becomes soft
  • Tamarind juice, extracted from a small lemon-sized ball of tamarind soaked in hot water
  • Carrot – 1, grated
  • Tomato – 1, chopped
  • Spinach leaves
  • Zucchini – ½, chopped (also you can use the veggies of your choice)
  • Turmeric powder – ¼ tsp
  • Sambar powder – 1 tsp
  • Salt to taste
  • Oil -2 tbsp
  • Onion – ½, sliced finely
  • Water – 1 cup
  • Water for pressure cooking the dal –  ratio 3 : 1

For the tempering

  • Oil – 1 tsp
  • Mustard seeds – ½  tsp
  • Fenugreek seeds (optional) – ¼ tsp
  • Asafoetida – a pinch
  • Curry leaves – few

For the garnishing

  • Coriander leaves

Instructions

  1. First soak the tamarind in  warm water. After 30 minutes, squeeze off the tamarind well, then filter the tamarind juice.
  2. Whash and chop the veggies.
  3. Rinse the tuvar dal thoroughly and drain out the water.
  4. Pressure cook the dal with water, turmeric powder and salt on medium flame for 2 to 3 whistles. The dal should become soft and mushy. Once the pressure settles down on its own, remove the lid, mash the dal to smooth using a wooden spoon and keep aside.
  5. Heat the oil in the pressure cooker, then allow to cook on a medium flame the onion for 30 seconds, and the tomato until it turns into a mushy texture while stirring occasionally.
  6. Add all the veggies, stir about 1 minute then add the sambar powder, water mix well and let it boil.
  7. Now add the tamarind juice and salt. Pressure cook again for 1 whistle, turn off the heat and maintain the lid closed for about 5 minutes.
  8. Add the smooth boiled tuvar dal. If the consistency of sambar is thick, then add some water.
  9. Check if there is enough salt, if needed add more.
  10. Bring the sambar to boil. Meanwhile heat the oil in a small pan. Put the mustard seeds, once the seeds crackle turn the heat on low flame, then add fenugreek seeds, asafoetida powder and curry leaves.
  11. Pour the whole tempering in the boiling hot sambar. Mix well and close the lid so the flavors can infuse.
  12. Garnish with coriander leaves.

Serve the Spinach Sambar hot with steamed rice, idli, dosa or medu vadai.

Tips

For faster cooking you can soak the lentils in water for 15 mins before cooking them.
Dont overcook the dal, as the taste of it diminishes.
Usually the vegetables are not cooked in a pressure cooker but in another pan. Cooking the vegetables in the pressure cooker reduces the cooking time considerably and also preserves the nutrients of the vegetables.

Health benefits

It is low in glycemic index. A bowl of sambar has a GI of 53.6%, thereby helping you to keep your blood sugar level in check without compromising on the taste.

Sambar is loaded with proteins and fibre. A typical 200 gm serving of sambar provides about 8-10 gm of proteins from dal (+more depending on the vegetables used). Moreover, it also provides 2-3 gm of dietary fiber, which helps in the overall growth and development of muscles when taken with idlis, dosas or rice.

Sambar is used as natural laxative. It is due to the high water content and the presence of fibre.

Sambar is a healthy weight loss recipe. This is because, with loads of vegetables and spices.

Sambar is a not only a storehouse of nutrients but also packed with proteins and fibre. And what could be better than having idlis or dosas with sambar in the breakfast !

Homemade Ginger Garlic Paste

Homemade Ginger Garlic Paste

Nothing beats fresh homemade ginger garlic paste

What is ginger garlic paste?

Ginger and garlic are mainstays of indian cuisine. Instead of chopping them for every dish, blend them into a paste that you can spoon directly into the pan. It makes cooking quick and easy.

Ginger garlic paste is an essential in Indian cooking. It is added to almost all of the Non-vegetarian preperations and a few vegetarian dishes. It is often paired with onion, tomato, or green chillies in gravy preparations.It is often used in rice preparations like biryanis, pulao and curries.

Ingredients

Use the same amount of ginger and garlic (meaning 1:1 ratio)
100 grams freshly peeled Ginger
100 grams peeled Garlic
1 tbsp of vegetable oil

Instructions

  1. Wash the ginger very well. Pat it dry completely using kitchen towel or paper towel.  Then peel and chop it into rough cubes.
  2. Peel the garlic
  3. Combine the ginger and garlic in a food processor or blender.
  4. When grinding process is almost done add oil. It acts as a preservative.
    Pulse to blend until it makes a smooth paste.
  5. Store the homemade ginger garlic paste in a clean, dry and  air-tight glass jar in the refrigerator.
    That way the paste can last two or three weeks.

Health benefits

Ginger’s medicinal properties are impressively extensive, and include its ability to enhance immune function.It has been used for thousands of years as a remedy for a range of health issues, including colds, nausea, arthritis, migraines, and hypertension.

Garlic is high in a sulfur compound called Allicin, which is thought to bring most of the health benefits. Human studies have found garlic supplementation to be an effective treatment for reducing blood pressure in people with high blood pressure.

You can find more informations here

Tips

Be sure ginger is completely dry, after its washed. It is important that there should be no moisture.
Do not use water while grinding ginger and garlic.
Always use clean and dry container for storing.
Do not put the jar of ginger garlic paste on the side doors of refrigerator, instead of that find out the coldest possible area in your refrigerator and put always your homemade ginger garlic paste there.
When needed for the recipe, remove the jar from the fridge, take out required amount using clean and dry spoon. Close the jar and put it back in the fridge immediately. Do not let the jar sit at room temperature while you are cooking the dish.